
Disclaimer: You are responsible for opening your computer and making modifications to it. Subtle Design will not be held responsible if you damage your computer. If you are not comfortable working on your computer, a computer shop near you would be glad to help!
iFixit has great photos and guides on how to work on MacBook Pros: https://www.ifixit.com/Device/MacBook_Pro.
We do not recommend running or installing macOS versions that aren’t officially listed as compatible by Apple with ‘patcher’ tools on your computer, as we can’t guarantee stability or features to work.
Installation
For A1342 White MacBooks, please click here to jump to installation supplement.
Estimated Time: 20 minutes; longer if a clean install of macOS is required.
We recommend reading the entirety of these instructions before you start to get an idea of what is involved.
Reference photos below are from a 13″ MacBook Pro install. 15″ and 17″ models will have less steps, but the installation is essentially the same.
Step 1: Make sure you are observing proper ESD precautions and remove any jewelry.
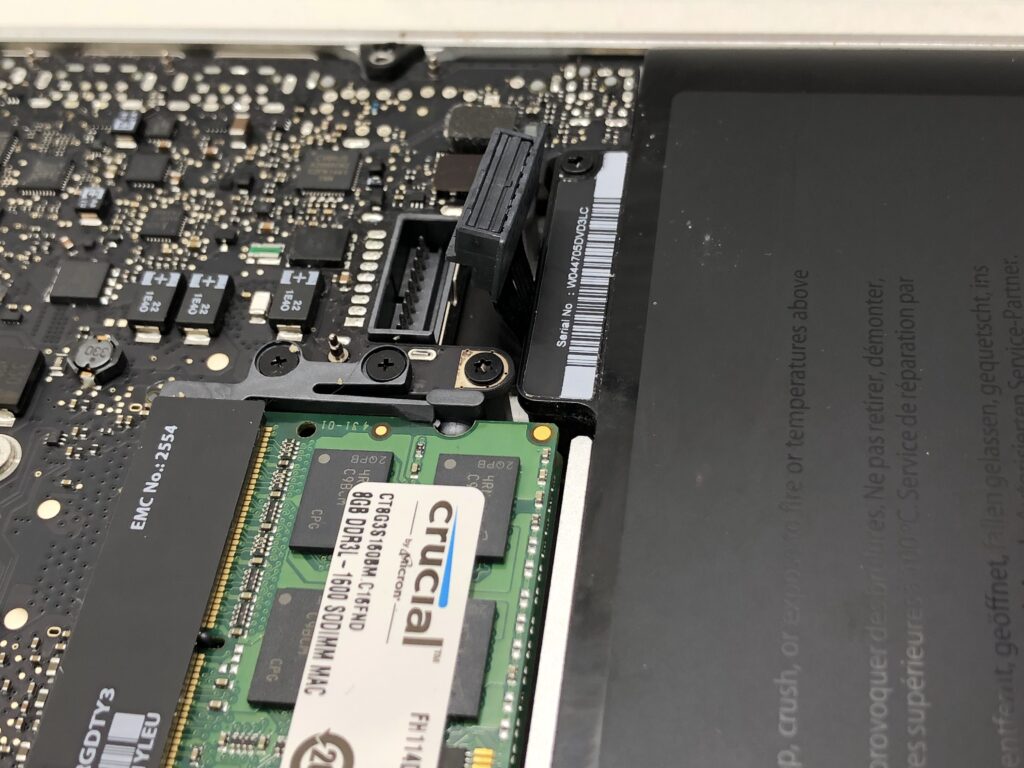
Step 2: Shut down the computer and remove the bottom lid.

Step 3: Disconnect the battery.
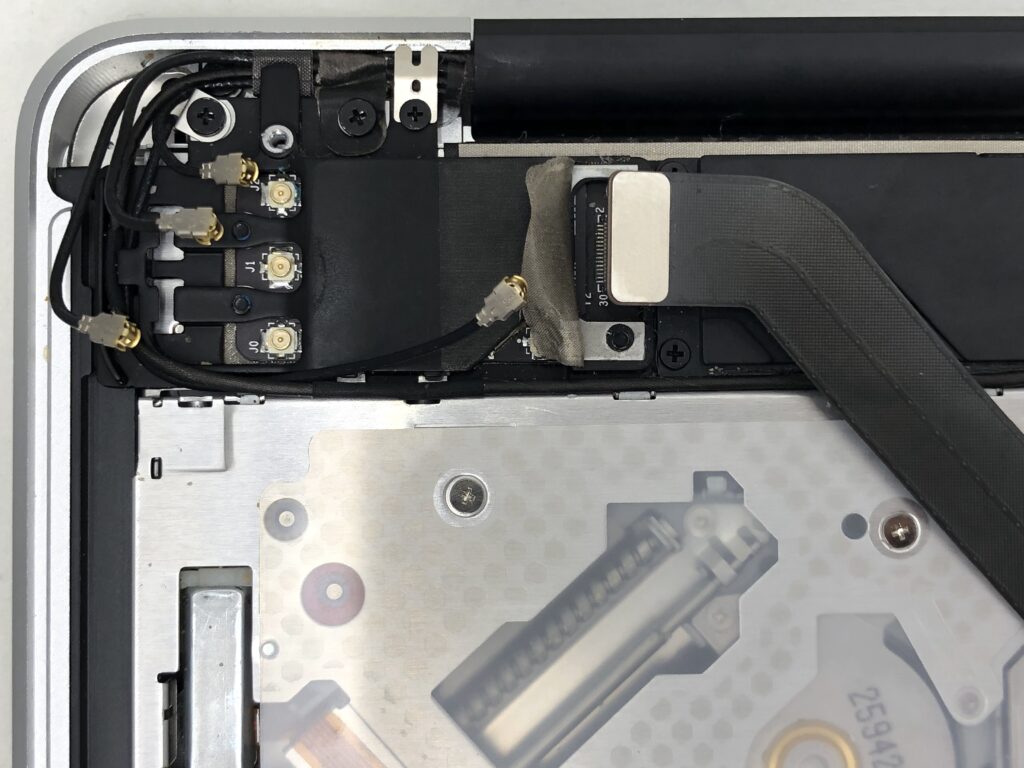
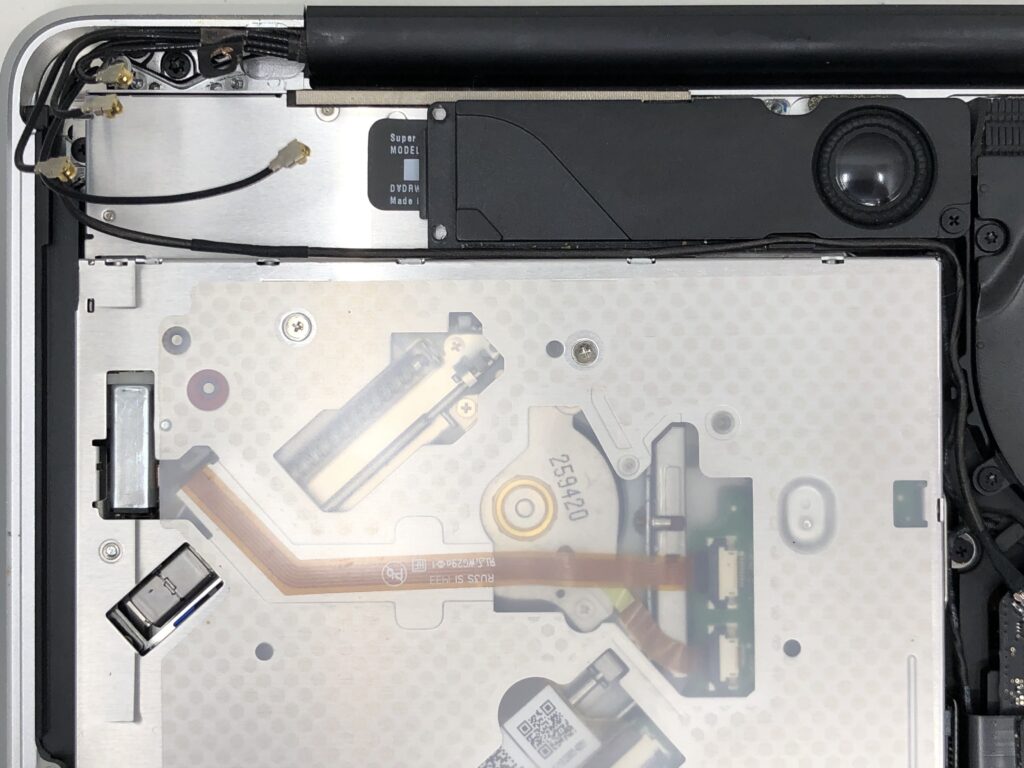
Step 4: Disconnect the antenna cables and flat flex cable from the AirPort card. To disconnect the flat flex cable, you will need to peel back the black EMI tape that covers the top of the connector. Be aware that the flat flex cable may be stuck with double sided tape to the AirPort bracket near the connector depending on the year of your MacBook Pro. If yours is stuck down, then you most likely don’t have the black EMI tape covering the connector either. Be very careful! The antenna and flat flex connectors are fragile; it is best to use a blunt plastic ‘spudger’ tool.
Step 5a: For 13″ MacBook Pro owners: Unscrew the three screws from the subwoofer and the two screws holding the AirPort bracket to the chassis near the antenna cables and hinge area. You will re-use the two screws that were used to hold the bracket to the chassis and will re-use the bottom right-hand screw from the subwoofer. For 15″ and 17″ MacBook Pro owners: Remove the screws holding the AirPort bracket to the chassis. You will not re-use these screws.
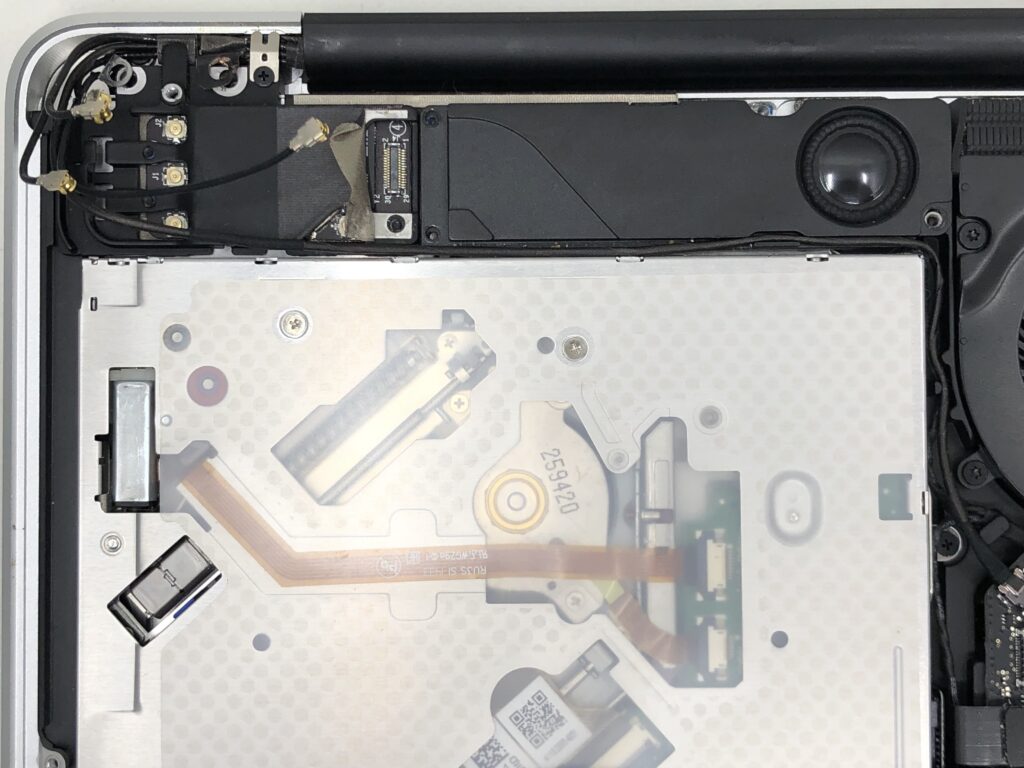
Step 5b: For all MacBook Pro owners: Carefully remove the AirPort card and bracket assembly, making sure to gently unroute the antenna cables and iSight camera cable from the grooves in the bracket first. You will not re-use the original bracket. Additionally, for 13″ MacBook Pro owners: You can now re-install the bottom right-hand subwoofer screw. This will leave you with two extra subwoofer screws that you will not re-use.
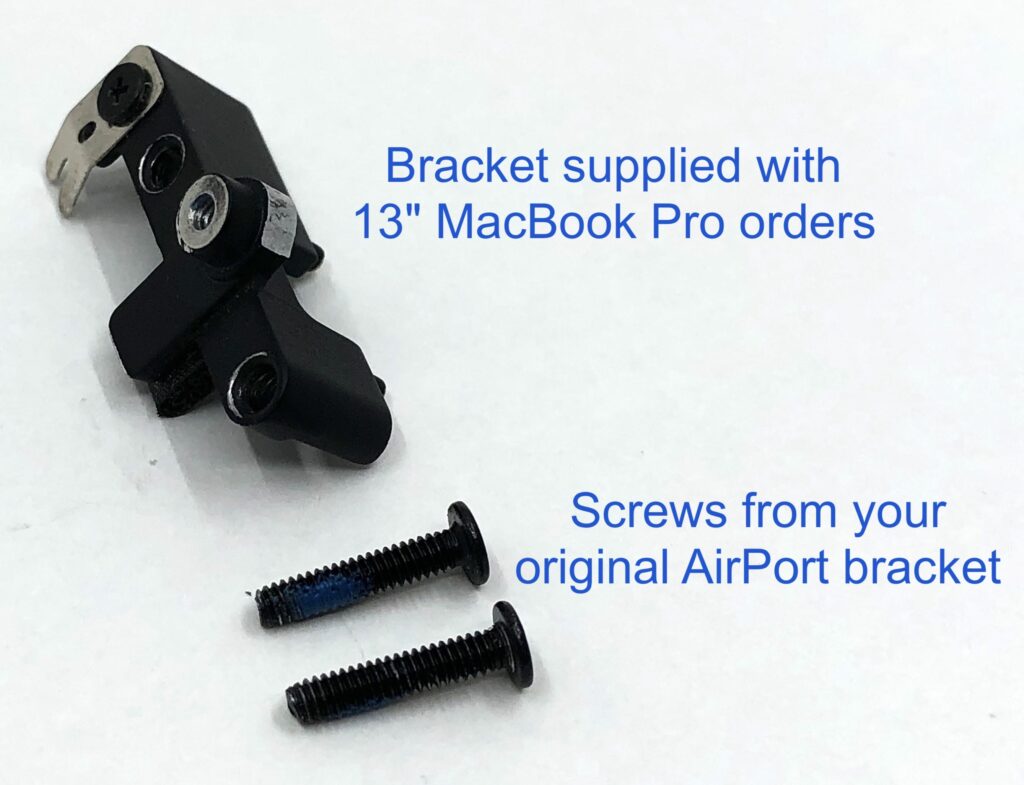
Step 5c: For 13″ MacBook Pro owners only: Install the bracket supplied with your order in the location where the original AirPort bracket was secured to the chassis near the antenna cables and hinge area using the two screws from the original AirPort bracket to secure the new bracket. This bracket serves as a fastening point for one of the screws for the bottom lid. To optionally secure the subwoofer to the optical drive, you can place a piece of double-sided tape underneath the left-hand side of the subwoofer towards the end.
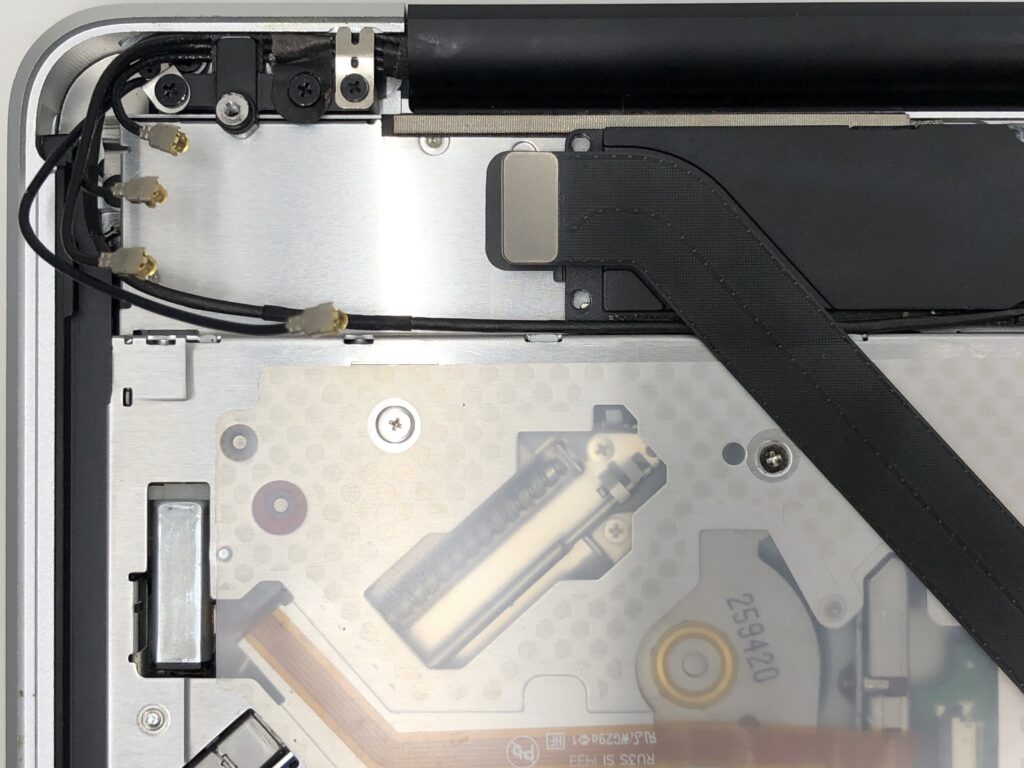
Step 5c continued: For 13″ MacBook Pro owners only: Photo showing the installed bracket. Note the ‘metal flap’ on the left and the ‘black cloth flap’ on the right under the screw heads securing the bracket to the chassis. Also, note the antenna cables are not pinched between the chassis and bracket.
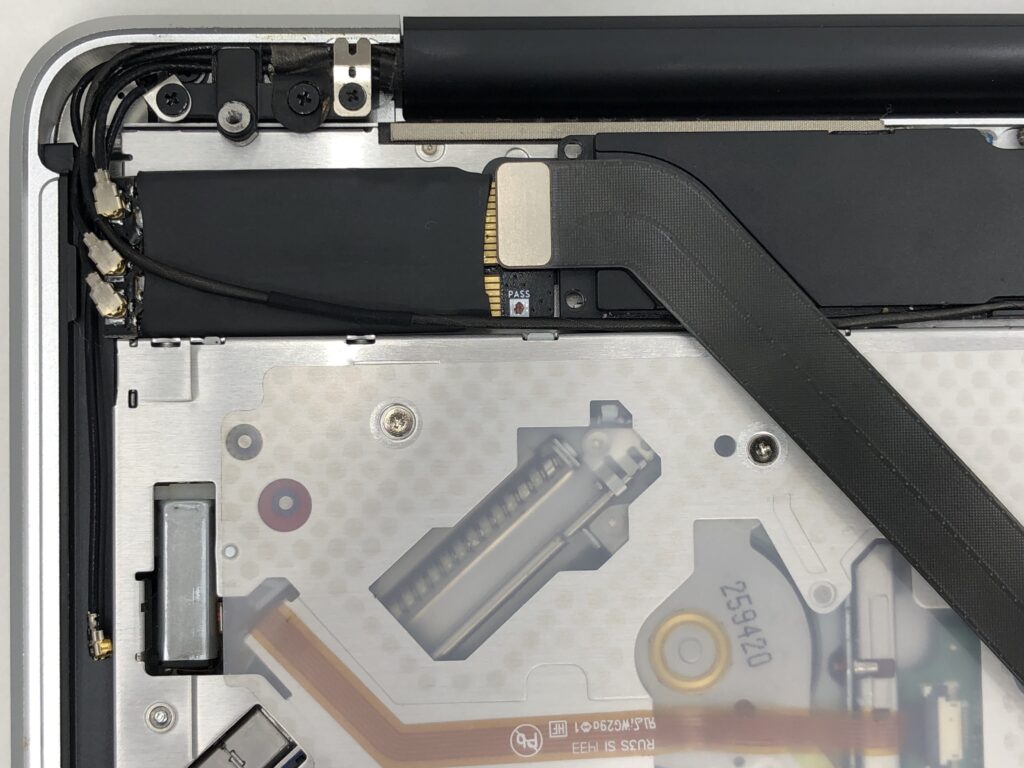
Step 6: Gently connect the flat flex cable onto the new card. Tip: It’s easiest to look at the connectors from the side to line them up. Make sure the flat flex cable lays over the iSight camera cable.

Step 7: Place the card onto the optical drive ‘shelf’, making sure the iSight camera cable that runs along the optical drive lays over the card. If you have an OWC Data Doubler installed instead of an optical drive, then you will need to ‘bridge the gap’ of the two rails with a thin piece of rigid material to recreate the ‘shelf’ of the original optical drive. Connect the three shortest antenna cables onto the antenna jacks on the card. You may optionally secure the card using low-strength tape to the top of the card and optical drive. If your MacBook Pro came with four antenna cables, tuck the longest one out of the way to the left of the optical drive, because the Bluetooth antenna is integrated into the card now. For 15″ and 17″ MacBook Pro owners: If your flat flex cable is too long, you can gently fold it over on itself twice (do not pinch or crease it!) so that the new card fits in the proper position on the optical drive ‘shelf’.
Final Step: Connect the battery, and making sure to not pinch any antenna cables, re-install the bottom lid.
A1342 White MacBook Installation Supplement
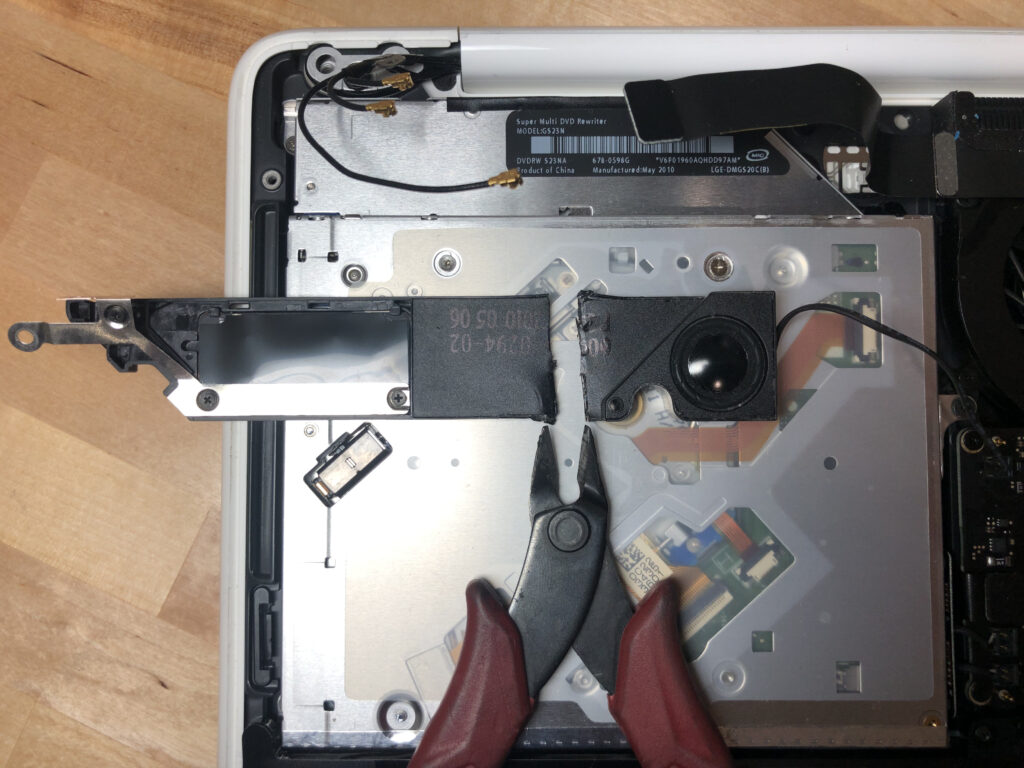
You will need to trim the original plastic Wi-Fi card/speaker assembly in the location shown so that the new Wi-Fi card will fit. Do not trim off the speaker’s screw hole! You will then flip the speaker over and fasten it back down to the chassis using the original long screw.
You will need to gently fold over the flat flex cable on itself twice (do not pinch or crease it!) so that the new card fits in the proper position on the optical drive ‘shelf’.
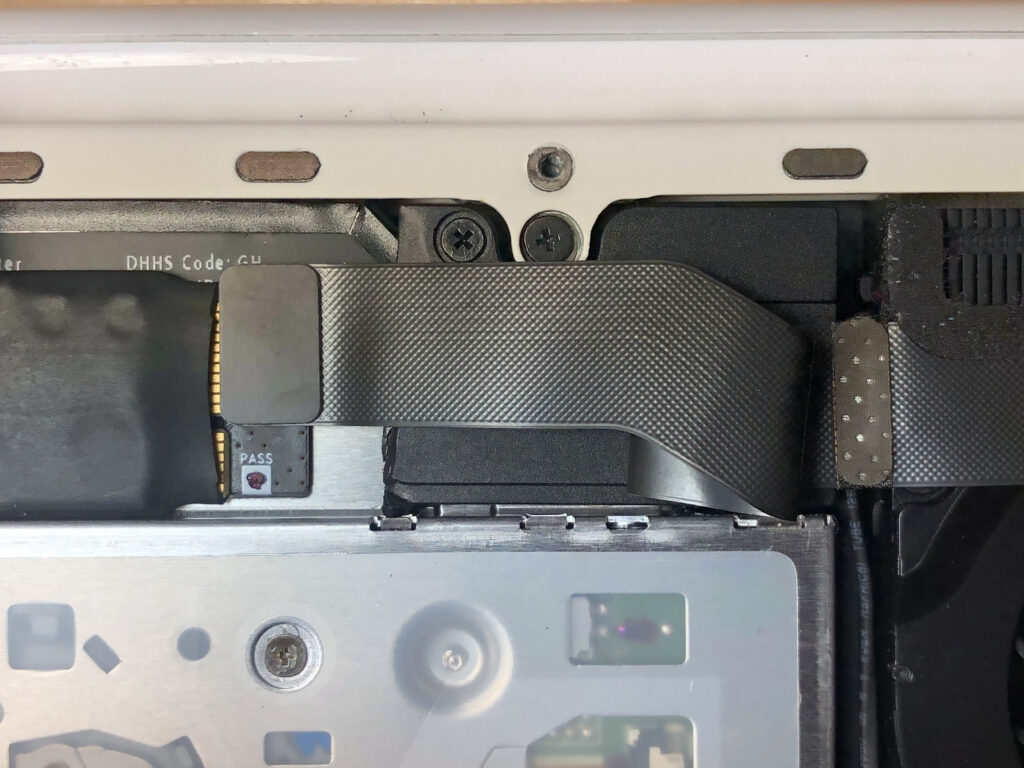
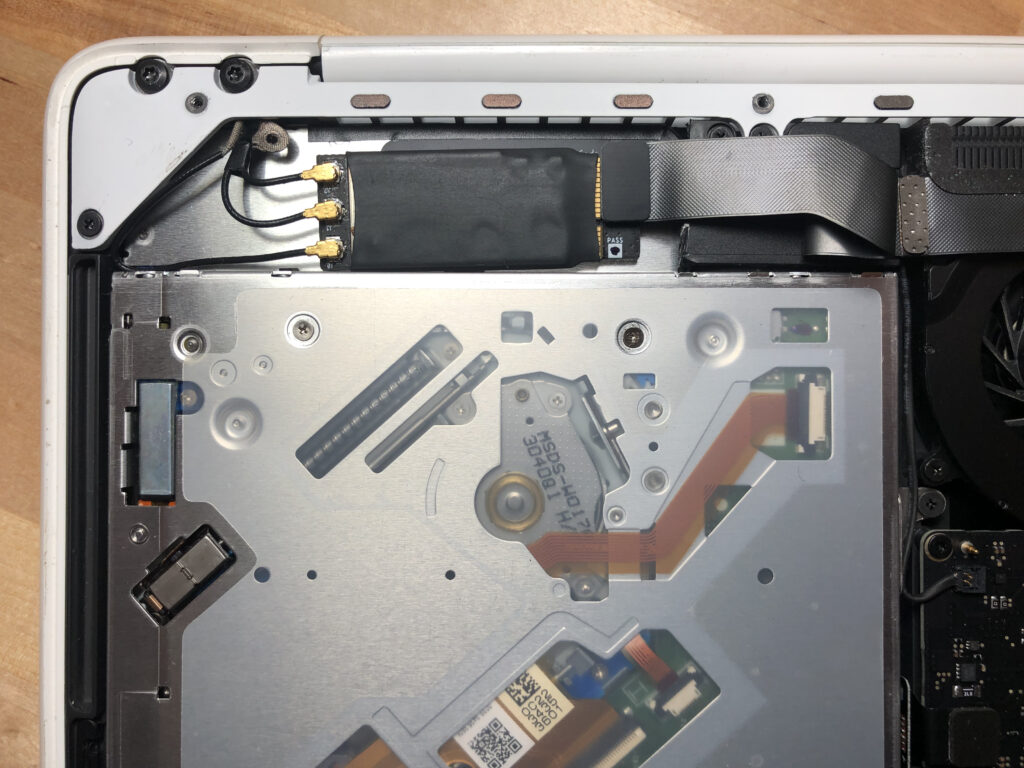
Photo showing the new Wi-Fi card installed in an A1342 White MacBook. You may optionally secure the card using low-strength tape to the top of the card and optical drive.
Troubleshooting
Bluetooth
Turn Bluetooth off, wait 10 seconds, and then turn it back on.
Make sure ‘Show Bluetooth in menu bar’ is check marked in: > System Preferences > Bluetooth.
While holding the shift and option keys, click the Bluetooth icon in the macOS menu bar and mouseover the Debug menu item, then click ‘Reset the Bluetooth module’ and confirm by clicking ‘OK’.
While holding the shift and option keys, click the Bluetooth icon in the macOS menu bar and mouseover the Debug menu item, then click ‘Remove all devices’ and confirm by clicking ‘OK’. This removes any previously paired devices that were associated with the original wireless card that you removed, so you will need to pair these devices again after the newly upgraded wireless card is installed.
Wi-Fi
Turn Wi-Fi off, wait 10 seconds, and then turn it back on.
Make sure to use the 5GHz band whenever possible. 5GHz allows for less interference and greater speeds, but can also have a reduced range compared to 2.4GHz. Choose the best settings applicable to your environment.
Use an appropriate router/access point with separate SSIDs for 2.4GHz and 5GHz bands. Some routers/access points do not work very well with macOS devices even if they work fine with iOS devices. All of our cards are tested with an AirPort Extreme model A1521 before shipment. Netgear routers can be problematic.
If your Wi-Fi interface is missing/not showing under: > System Preferences > Network, then click the ‘+’ button at the bottom left-hand corner of the window. Select ‘Wi-Fi’ under the ‘Interface:’ dropdown, name it ‘Wi-Fi’ under ‘Service Name:’, and then click ‘Create’. If this doesn’t work, then you will most likely need to perform a clean install. (Jump to Other Issues)
Handoff (Continuity)
We have made a guide, located here: https://subtle.design/wp-content/uploads/802.11ac/HandoffGuide.pdf for activating Handoff (Continuity) for older computers, and for rare cases where newer computers that seem to have trouble activating it (if you don’t have any issues, then disregard the guide).
Make sure ‘Allow Handoff between this Mac and your iCloud devices’ is check marked in: > System Preferences > General. Additionally, sign out of iCloud and then sign back in.
Make sure your devices are signed into the same iCloud account and are on the same Wi-Fi network.
For iOS/iPadOS, make sure Handoff is enabled in Settings > General > AirPlay & Handoff.
On Apple Watch, open the Watch app on your iPhone and go to My Watch > General, and then tap to enable Handoff.
It may be necessary to disable and re-enable Handoff on all of your iCloud devices in addition to rebooting them.
Apple article for Handoff: https://support.apple.com/en-us/HT209455
Watch Auto Unlock
We have made a guide, located here: https://subtle.design/wp-content/uploads/802.11ac/HandoffGuide.pdf for activating Handoff (Continuity) for older computers, and for rare cases where newer computers that seem to have trouble activating it (if you don’t have any issues, then disregard the guide). Even though this guide is written as a Handoff guide, all of the steps in this guide still apply for getting the newer Bluetooth 4.2 recognized in the system to allow for the Watch Auto Unlock feature.
Make sure ‘Use your Apple Watch to unlock apps and your Mac’ or ‘Allow your Apple Watch to unlock your Mac’ is check marked in: > System Preferences > Security & Privacy. Additionally, make sure ‘Allow Handoff between this Mac and your iCloud devices’ is check marked in: > System Preferences > General. Additionally, sign out of iCloud and then sign back in.
Make sure your devices are signed into the same iCloud account and are on the same Wi-Fi network.
Make sure your Apple Watch has a passcode set up in addition to having two-factor authentication enabled for your Apple ID.
There have been issues recently with watchOS and getting Auto Unlock to work. Hopefully Apple will fix these bugs soon.
For resolving issues with macOS High Sierra, we have created this tutorial guide here: https://subtle.design/wp-content/uploads/802.11ac/HighSierraWatchUnlockGuide.pdf
Here is also a great article diagnosing the ‘Your Mac was unable to communicate with your Apple Watch Error Message’: https://appletoolbox.com/your-mac-was-unable-to-communicate-with-your-apple-watch-error-message-how-to-fix/
On Catalina, this post on MacRumors has solved Auto Unlock issues for many people: https://forums.macrumors.com/threads/watchos-7-beta-5-unlock-mac-doesnt-work.2250819/page-2?post=28904426#post-28904426
Apple article for Auto Unlock: https://support.apple.com/en-us/HT206995
Internet Recovery/EFI Boot
It is normal if no Wi-Fi networks are detected if you are trying to perform an internet recovery with the upgraded Wi-Fi card installed; this is because the system EFI firmware won’t have the bootcode needed for the newer Wi-Fi cards the computer wasn’t originally designed to utilize. Modifying the firmware with the possibility of a bricked computer isn’t worth the risk.
If you need to perform an internet recovery, we recommend using an ethernet cable, or install from an external USB drive.
Other Issues
Make sure to update macOS to the latest available and officially supported version by Apple, and also reset both the SMC and NVRAM/PRAM. Shutting down and rebooting into Safe Mode may also help.
MacRumors article on how to boot into Safe Mode: https://www.macrumors.com/how-to/use-safe-mode-resolve-mac-startup-issues/
Apple article for SMC reset: https://support.apple.com/en-us/HT201295
Apple article for NVRAM/PRAM reset: https://support.apple.com/en-us/HT204063
If this doesn’t work, then you will most likely need to perform a clean install of a version of macOS that is officially listed as compatible by Apple for your computer (preferably High Sierra or Mojave as a starting point). This is because Apple hasn’t shipped the correct drivers in certain macOS versions and Catalina has had a lot of bugs.
This is a living document and may be improved over time. Last Updated: April 6th, 2025 – 9:35 AM CDT